Search This Blog

Showing posts with label recipe. Show all posts

Sunday, April 24, 2011

Fudge Brownies with Himalayan Salt

HAPPY EASTER!!! -- Annie got to go plastic Easter Egg hunting for biscuits!

We have had a busy day today! I had a bit of a brownie fail yesterday (in my opinion, it is pretty hard to FAIL brownies...they were still really good with marionberry sauce and coconut ice cream), so this morning I woke up determined to figure out what I had written out incorrectly when I jotted down the ingredients from a very successful batch.

These brownies are very moist and a bit spongey the first day and become more dense as they cool down. They are a bit rich for frosting, but they are great with a fruit sauce and plain vanilla "ice cream."


Fudge Brownies with Himalayan Salt

2.5 oz cacao powder
1.5 oz sorghum flour
1.5 brown rice flour
1 oz tapioca flour
2 T ground chia seed
1/2 tsp salt
1/2 tsp baking powder
pinch of cinnamon
3.5 oz finely grated sweet potato
7 oz coconut milk
7 oz maple syrup
3 T sunflower oil
2 T agave

Preheat the oven to 375 degrees. Combine all the dry ingredients thoroughly in a mixing bowl. I recommend at least sifting the cacao powder to eliminate lumps. Add the finely grated sweet potato, coconut milk, maple syrup, sunflower oil, and agave. Put the batter in an 8X8 inch baking dish lined with baking paper. Bake for 25 minutes and take it out of the oven so you can add some freshly ground Himalayan salt evenly over the top (around 1/3 of a tsp). Put back in the oven for another 10-20 minutes, or until a toothpick comes out fairly clean and the edges are a little darker. Let cool before attempting to cut.

After dropping off the brownies at the Sidecar for Pigs Peace, we decided to figure out if a scene from the TV series The Killing was plausible. We really enjoy the show for two reasons. 1. It's based in Seattle. 2. It's fun to try to pick out exaggerations or errors. They showed a submerged car in a pond at Discovery Park, which they claimed was a popular place for "johns" to take their prostitutes. Discovery Park is on the edge of Magnolia, which is known for being a very nice neighborhood. It's not remotely near the neighborhoods that are typically known for that kind of activity. Then again, maybe they know something I don't. We also weren't aware of ponds at Discovery Park.

Look - A pond! One of 3 near the Daybreak Star Indian Cultural Center and Wolf Tree Loop

While I think they may have filmed that particular scene elsewhere, there is a pretty sizable pond near an access road. I don't know the depth of the pond, but it's definitely murky enough.

After we found the ponds, we went on to better things. Watching Annie "hunt" squirrels!!!

"Is that a SQUIRREL???"

"HEY! Are there any squirrels in there??"

"I think I saw a squirrel!!!"

I would like to say that we always have a leash on Annie unless she's in a securely fenced area. She is a fast little monster and I'd hate to see what she would do with a squirrel, and we'd have a tough time getting her back.

I found something beautiful as well. Trilliums! Trilliums are a fragile flower that can occassionally be found in state parks across the northern US. It is illegal to attempt to transplant or pick them in several states because doing usually quickly kill the plant. It's best to enjoy how beautiful they are from a bit of a distance.


It was great to get outdoors and enjoy the patches of sunlight!

Saturday, April 23, 2011

Snickerdoodles


Snickerdoodles are my childhood favorite, but they have vexed me in the past. I've had many failed recipes - any posted previously just were not quite there. It was either a texture issue, or the flavors were a little muted or exaggerated. The snickerdoodle is the recipe I have altered or scrapped all together several times. I think perhaps my arch nemesis has fallen and I've finally achieved the trifecta - texture, taste, and appearance.

There is a fairly consistent phenomenon particular to gluten-free cookies that took me a while to adapt to. Gluten cookies are better off if you take them off the pan immediately. They hold their shape pretty well and a little aggressive spatula work may cause a couple cookies to be put in the imperfect pile (in my house that means they are eaten immediately - it's the best way to ensure no one sees those imperfect cookies, right?). If you don't get them off the pan immediately, you're scraping and soaking a pan. Gluten-free cookies will come out of the oven squishy and unstable. With this recipe, if you try to take them off the pan before they have had plenty of time to cool, you will end up with half the cookie still on the sheet and a big crumbly mess. If you let them sit for at least an hour or two, they will have that typical, hard snickerdoodle texture. These are best made the night before you plan to serve them.

Snickerdoodles
makes 12 large cookies
4 oz palm oil
1/3 cup sugar
4 oz brown rice syrup
1/2 c water
1/2 vanilla bean, scraped
1 T ground Chia seed
3.8 oz tapioca flour
6.8 oz white rice flour
1.2 oz amaranth flour
1/2 tsp salt
1/2 tsp baking soda
1/2 tsp baking powder
1/4 tsp cream of tartar

Sugar & cinnamon to coat

Preheat the oven to 350 degrees. Combine the sugar, flours, vanilla, chia seed, salt, baking soda, baking powder, and cream of tartar in a mixing bowl. Gently melt the palm oil either in the microwave or sauce pan. Combine the oil, brown rice syrup, and water with the dry ingredients. Once the ingredients are combined, take a ball of dough about the size of a golf ball and roll the dough in sugar and cinnamon. Press slightly onto the cookie sheet to form a round shape. Space the cookies at least an inch to two inches apart as they will raise and spread. Bake for 12 minutes.

Sunday, April 17, 2011

Winter Vegetables with Celerly Root Puree


I was a little pout-y about not being able to eat fruit and starchy foods, and it was about time to snap out of it and start creating some tasty, lower carbohydrate meals. Seattle is unseasonably cold right now. The plants are just starting to bud out and our little garden is under a cloth cover, which is a good thing because we've had some frosty mornings lately. The freshest foods are still the early spring crops - arugula, kale, greens, leeks, fennel, and root vegetables.

I decided to try a celery root puree with winter vegetables yesterday. I am a garlic fanatic, so added more garlic than some people may like. The puree would be a great alfredo substitute as it is very creamy. Celery Root (celeriac) has 1/3 the carbohydrates, less than half the calories, and the same amount of fiber as potatoes. It also has a very velvety texture and lends well to purees.

Winter Vegetables with Celeriac Puree

Puree
1 celery root
4 cloves garlic
2-3 T olive oil
1/4-1/2 tsp salt
fresh ground pepper to taste
1/4+ water

Clean, peel, and dice the celery root into 1/2 inch or smaller cubes. Mince the garlic. Heat a pan over medium heat and get the olive oil hot. Put the garlic in the oil until it becomes very aromatic (less than a minute; 15-30 seconds). Add the celeriac and cook until the root is easy to pierce with a fork. Take off the heat and let cool a little. Put the celeriac and garlic in a blender, along with any of the excess olive oil. Add enough water to get the blender blades turning smoothly and add the salt and pepper.


Winter Vegetable Saute
1 leek
1 fennel bulb
1 bunch kale
1/2 tsp caraway
1/2 tsp mustard seeds
pinch salt

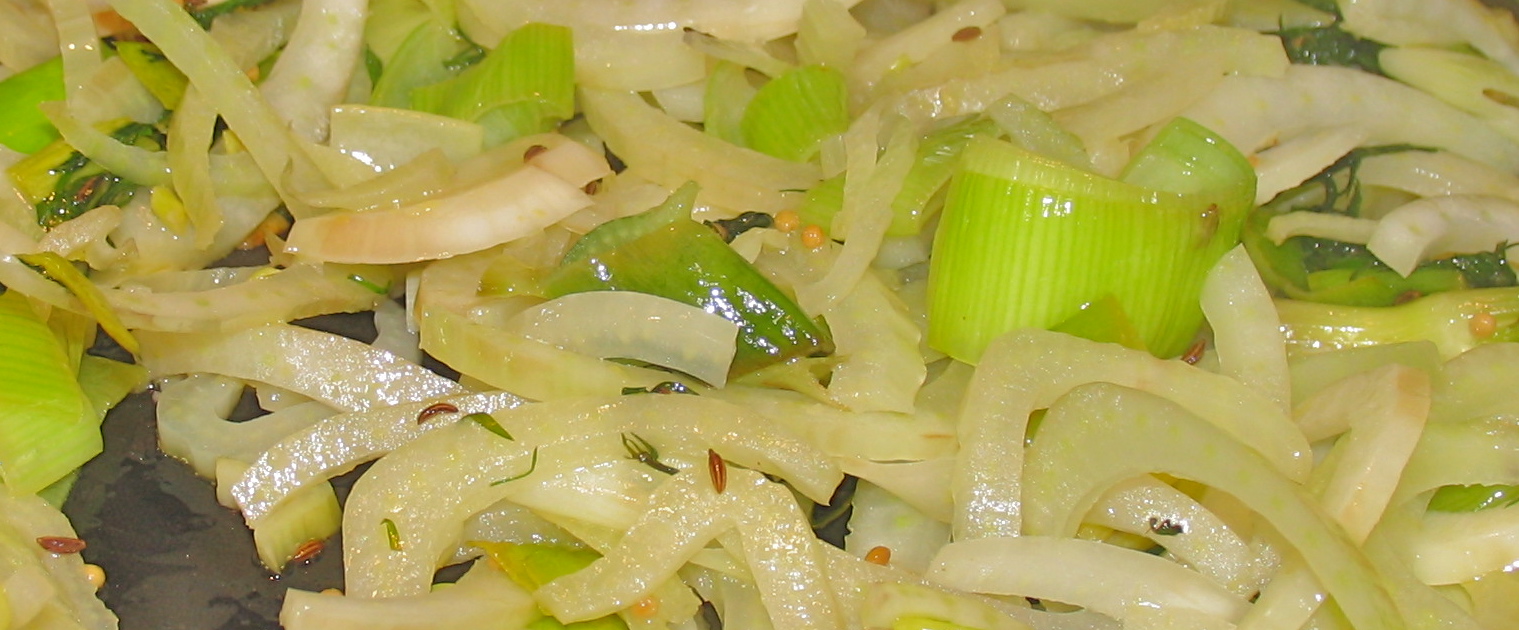
Thoroughly clean the leeks by slicing the leeks into rings and soaking them in a big bowl of water with a tsp of apple cider vinegar. Cut the base off the fennel and slice it with a mandolin slicer (slicing thinly with a good knife works too). Put the pan over medium heat and add some olive oil after the pan warms up. When the oil is warm, add the leeks. Once the leeks turn into a vibrant color, add the fennel, mustard seed, and caraway. Add the fennel.


Once the fennel is slightly translucent, add the kale and salt.


When I first made this, I put the saute over some kelp noodles. Noodles add nothing to this dish - it was much better with just the saute and celeriac puree.

Friday, April 15, 2011

Tacos!

I was going to blog about the injustices of ignoring childhood allergies, but tonight I feel like something a little lighter. Tacos! OK, maybe they aren't really "light," but it's a more uplifting topic.

Bean Prep

Beans, beans the magical fruit, the more you eat the more you.... You know how the rest of the rhyme goes. If you don't know how the rhyme goes, you either had very impressive digestion as a child or are extremely sheltered. Beans have a reputation for being very hard to digest. The complex sugars that encase the bean survive the environment in your stomach and often travel all the way to the large intestine, where bacteria normally present in the gut become unbalanced as they feast and multiply, releasing gas that supply us with inspiration for the aforementioned rhyme.

There are several theories on how to reduce the oligosaccharides that cause the bottom burping people fear so much. Pre-soaking, changing cooking water, boiling with kombu, and shocking the beans while boiling with cold water are all theories. I tend to use at least two methods. I try to plan ahead and use dry beans because they are very affordable and more eco-friendly than canned. It also avoids the resin lining and BPAs that seep into our food (YUMMY!). Lentils and split peas are legumes that I soak for a day or less. Adzuki, black beans, pinto beans, and kidney beans are soaked for 24-48 hours, and I try to change the water and rinse them thoroughly at least 3 times a day. The beans are then cooked in at least 4 times the volume of water, which I dump out and refill after it begins to look dirty. I cook them in mid heat for at least 45 minutes to 90 minutes or until the bean is nice and squishy. I plan on also using kombu, but as someone with questionable digestive capabilities, I can say that soaking and changing the soak water frequently definitely seem to help considerably.

Taco Beans
1 yellow onion, cut into rings
3 cloves garlic, minced
1/2 seeded jalapeno, minced
1/2 tsp cumin
1/4 tsp mustard seeds
2 1/2 cups cooked black, pinto, or kidney beans
2 Tb coconut aminos
1/2 tsp salt
fresh ground pepper to taste
lime juice
1/4 cup fresh cilantro, rough chopped

Heat a pan over medium heat. Once the pan is nice and warm, add a few tablespoons of olive oil to coat the pan. When the oil is ready (rippling very slightly on the surface but definitely not smoking), add the onions and garlic. Cook until the onions start to look slightly transluscent and add the jalapeno, mustard seed, and cumin. Once the spices become more aromatic and the onions are translucent, add the beans, salt, coconut aminos, and fresh ground black pepper. Once everything is heated and combined well, turn off the heat and add the lime juice and cilantro.


Guacamole
2 ripe avocados
1/2 tsp salt
1/4 tsp fresh cracked pepper or to taste
1/4 c finely minced onion
juice from 1 lime
1/4 cup+ rough chopped cilantro

Mash the avocado with a fork. Add the onion, salt, pepper, lime, and cilantro and combine thoroughly. Guacamole is one of my favorite dips. If I don't have fresh cilantro or lime, I'll substitute lemon juice an cumin with a pinch of red pepper. It's also great with a little jalapeno or pomegranate seeds.


Macadamia Sour Cream
1/2 c macadamia nuts
1/4 c water
1/2 lemon, juiced
pinch salt

Blend in a high speed blender. If the blender isn't turning well, add a little more water until smooth.

Building a Taco

Tacos are so great because it's like choose your own adventure. Add in salsa, pico de gallo, lettuce, vegan cheese, pineapple, mango, bell peppers, or anything else your heart desires. Wrap up your filling in a gluten free taco shell like my gluten free tortilla I or II wrap recipes. The key is to not overfill, which is why my husband elects to have 3-4 tacos instead of succumbing to a fork and knife.

Good News

Experts are finally starting to acknowledge that food intolerances are real and damaging to the intestines and overall immunity. They are also realizing that gluten is a hard to digest food, and Celiac is likely only an extreme on the spectrum of gluten intolerance. Many people can benefit from avoiding gluten, so if you are having abdominal pain, bloating, excessive gas, mental fog, and/or fatigue, it might be worth cutting it out of your diet for a few weeks to see if there is a change. With this type of reaction, the change won't be apparent immediately.

A gluten free diet is also not healthy by default. I know someone who chooses to live on primarily corn chips and salsa and lives by the "if I don't see it on the menu or don't read the ingredients, it doesn't have gluten" rule. It's important to talk to a nutritionist about avoiding gluten and how to make a very balanced diet. While I try to find ways to sweeten with fruits and other alternatives, some of my recipes are definitely NOT health food. I enjoy those foods on rare occasion. The majority of my days are dessert free and low carb.

Monday, April 4, 2011

Vegan Marionberry and Chocolate Cheezcake


Vegan cheezcakes are so decadent that it's hard to tell you aren't having the real thing. They are very creamy, smooth (if one has the right type of blender), and all of my non-vegan friends love them. My brother has even requested them in place of a traditional birthday cake. One slice is usually a full meal. Cheezcakes are packed full of nuts, other fats, and a lot of sweetener, so I try to enjoy a slice as a rare treat. When I first started a vegan diet, I indulged much more frequently, but I've noticed that my body absorbs fat more readily now. It probably has something to do with adjusting to the diet because I've heard of several other people who started out on a "gourmet" raw vegan diet that was high in fat and had to dial way back over time after they adjusted.

Vegan cheezcakes are best made the day before you intend to serve them. They need time to firm up (although the "pudding" is also delicious). I don't like to call them raw because many of the nuts we have access to in the bulk section of grocery stores are pasteurized before making it to the store. The recipe is very close to those available in Sweet Gratitude, an uncookbook by Cafe Gratitude.


Marionberry Chocolate Cheezcake

Crust
1 1/3 c. almonds or hazelnuts
5 ounces date paste
2 ounces cacao powder
1 vanilla bean, scraped
pinch salt

Filling
3 cups soaked cashews
2 cups macadamia or cashew milk (Living Harvest Vanilla Hemp Milk may work)
3/4 c agave syrup
juice from 1 lemon
1 vanilla bean scraped
1/2 tsp cinnamon
1/4 tsp salt
2 TB sunflower lecithin
1/2 c cacao butter
1/4 c coconut oil

14 oz frozen Marionberries
2 oz cacao powder

Put the cashews in a bowl to soak. Pit around 15 dates and soak them in water for 20 minutes. Butter the sides of a spring-form pan with coconut oil. After the dates are done soaking, put them in a food processor with an S-blade until the dates stick together in a ball. Split the dates in half and add the nuts, salt and vanilla. After the nuts have broken down, add the rest of the dates and process until the mixture is crumbly, but will hold together if pressed.


Press the crust into the bottom of a spring-form pan. Add 6 oz of marionberries on top of the crust.


Put the coconut oil and cacao butter in a pan on the lowest heat to melt (as soon as it's melted, remove from the heat). Add the cashews, lemon juice, nut milk, agave, cinnamon, salt, and vanilla to a high speed blender. If you have a normal blender, you will need to soak the cashews for a couple hours, split the recipe for the filling in two, and process one batch at a time. Put the filling in a large bowl and use a hand mixer to combine sunflower lecithin and oils into the filling.


Put 2 cups of filling back in the blender with 8 oz of marionberries and mix until very smooth If you have a normal blender, you may want to have thawed berries and cook for a short time to soften, then strain out the seeds. Use the hand mixer to mix the remaining plain batter with the cacao powder. Pour the chocolate batter over the marionberries and smooth out the surface.


Add the marionberry filling over the top of the chocolate filling and smooth out the surface.


Add marionberries as a garnish if you would like.


Put the cheezcake in the freezer for 2 hours and then move to the fridge. Serve after the mixture has been able to set for a minimum of 8 hours.

In other news, Annie continues her vegan leaning tendencies. My husband came to pick me up from acupuncture and said, "Well, Annie sure is your dog! We were eating at a restaurant and she was a very good girl until someone came in with a big leather purse. She barked at it! Even when I calmed her down she was still growling at the purse from time to time." I won't encourage her behavior because I want her to be a reliable citizen, but deep down I think it's just a little bit awesome.

"Bon Appetit!"

Wednesday, March 2, 2011

No Chicken and Dumplings


I watched the flu sweep through the office over the past few weeks and would cringe while I sat in meetings with coworkers who were coughing, sneezing, and sniffling. I managed to dodge the main wave. Those of you with children know that once they go to preschool or daycare, there seems to be several months of the child contracting and passing along cold after cold. Owen has started going to preschool and brought home a humdinger of a cold that got him the nickname "Typhoid Pookie." My grandmother, mom, brothers, and now husband have all contracted "Pookieitis." Now I have been getting the sniffles and have been making huge pots of soups. My favorite growing up was Chicken and Dumplings. I wasn't huge on the chicken, but I LOVED the dumplings. I decided to make it vegan and gluten free.

No Chicken Soup
2 large sprigs of fresh Rosemary
3 clippings of fresh Oregano
3 fresh Bay Leaves
1/2 cup rough chopped Parsley
1 tsp Salt
Pepper to taste
1/2 head Garlic
1 large Onion
6 stalks Celery
4 Carrots
3 quarts - 1 gallon Water
3-4 Tb Olive Oil
10 small Crimini or Button Mushrooms, quartered

Dumplings
1/4 cup Tapioca Flour
1/2 cup Brown Rice Flour
1/2 cup Teff Flour
pinch Salt
1/2 tsp dry Sage
3 TB Palm Oil
around 1/2-3/4 cup water

Cut the vegetables into one inch chunks. Mince the garlic and add all of the ingredients except the mushrooms into a large soup pan. Turn the heat up to a high medium, simmer for 20 minutes and bring to a boil. Put the flours, salt, and sage for the dumpling ingredients into a mixing bowl and combine. Use a fork to press the palm oil into the other ingredients until combined. Add the water until the dough combines well but is still easily handled. Form dumplings about half the size of a golf ball. Once the soup is in a rolling boil, add the dumplings one at a time, spaced apart from each other so they do not stick. Once the dumplings have been added, add the mushrooms. The dumplings will float to the surface once they are done - after about 20 minutes in the soup. Pick out the rosemary twigs, oregano, and bay leaves while serving.

Sunday, February 27, 2011

Brownies


This weekend has been full of good things. Yesterday, I spent some time grocery shopping with my mom. We went to rawvegansource.com's store in Redmond. I enjoy speaking with the owners, and I picked up some liver support supplements, coconut oil, and some tasty dehydrated snacks. The owners have a large garden designed with the principles of permaculture in mind, and we picked up a couple suggestions for some locally run nurseries that emphasize sustainable and natural methods.

Mom and I also went by the Redmond Whole Foods on the recommendation of some friends. There is a really large "special needs" section! Their gluten free section was about the size of some specialty shops I've seen in Kent and Everett. I found some rice krispy-ish cereal to attempt vegan rice krispy treats! I also found some donuts and bagels Lance really enjoys on sale, so I indulged. My diet is actually very low carbohydrate and I don't eat a lot of sweets, so I raided the greens and picked up some nice looking almonds.

After a day of shopping, I came home and spaced out in front of the TV and had some sauteed Brussels Sprouts and olives before going to the Medieval Women's Choir at St. James Cathedral in Seattle with the girls. Usually musicals and operas are not my thing, but I really enjoyed this event. The music is a bit simple, which really allowed the soprano's voice to be on full display. Her voice was gorgeous and had a clarity that was just stunning. Closing my eyes and listening to the music transported me back to a time of pristine land, difficult living, and simple needs.

Today, Lance went skiing early this morning. He walked and fed the dogs, who were content after he left and let me sleep in until 9. We all got up and I had breakfast, cleaned the kitchen, and then worked on a business plan. My mom stopped by and we all went on a long walk in a slight drizzle. It was absolutely freezing here yesterday, but today was considerably warmer and the snow had turned to rain. We got inside right before the downpour and enjoyed a romaine and cucumber salad with a avocado pepper dressing that went well with almonds and capers. I had attempted brownies a few days ago and discovered that there IS such a thing as too much chocolate (no really - it was INTENSE), so with a few tweaks, we had a successful batch this evening. I will probably continue to fine tune the recipe (and add varieties like mint, raspberry, etc), but I haven't posted in a while and thought I would share what I have so far.

Gluten-Free, Vegan Brownies

These brownies are dense, which is how I prefer my brownies. I like them without frosting and Lance likes them with Coconut Bliss ice cream piled on top. This is a recipe that is best done ahead of time. A fine crust will form over the top over night, giving these brownies a classic, rich taste and texture.

3 oz cacao butter
3 oz coconut oil
3 oz cacao powder
1.5 oz sorghum flour
1.5 oz brown rice flour
1 oz tapioca flour
1/2 tsp salt
1/2 tsp baking powder
2 T chia seeds
3.5 sweet potato, cooked and mashed
7 oz maple syrup
3 oz agave

Preheat the oven to 350 degrees. Melt the cacao butter and coconut oil on the lowest possible stovetop setting. Combine all dry ingredients in one bowl and the mashed sweet potato, maple syrup, melted oils, and agave in another. Slowly add the wet ingredients into the dry while stirring. Line an 8X15 inch pan with baking paper, and pour the batter into the pan. Bake for about 25 minutes. The center will look a little moist, but it will quickly take on a cake like appearance as it continues to cook outside of the stove.

Monday, February 21, 2011

Apple Crisp


I found a great sale on three pound bags of pink lady apples. Several weeks ago. Since then, I discovered that I don't do well with many carbohydrates and adopted a low carb diet and completely forgot about the apples. If I was going to go on a baking tear last night, I needed to use up those apples. The easiest way I know how is with an apple crisp. I tend to like tart desserts, and warm apple crisp goes really well with Coconut Bliss vanilla ice cream!

Apple Crisp

1.5 pounds Apples, peeled, cored, and sliced
1/4 c Palm Oil
1/2 c Oats
1/2 c Sugar
1/4 c Brown Rice Flour
1 T Tapioca Flour
3/4 tsp Cinnamon
1/4 tsp Ginger
fresh grated Nutmeg
pinch Cloves
pinch salt

Preheat the oven to 375 degrees. In a 9X9 pan, layer the apple pieces. If you like a sweeter dessert, you can layer additional cinnamon and sugar among the apples.


Put the other ingredients in a bowl and combine with either a fork or a pastry cutter. Spread the crumble over the top of the apples.


Bake for about 30-45 minutes, or until the apples are tender.

Sunday, February 20, 2011

Gluten Free, Vegan Cinnamon Rolls


I feel bad I haven't taken the time to blog lately. Things have been busy and tiring (and fun!). Yesterday I dropped off some goodies for a bake sale and we had a small get together. I finally conquered the Snickerdoodle (YAYY!), which got rave reviews along with my lucuma banana cupcakes with vanilla icing. Today I went to discuss renting a commercial kitchen so I can attend farmer's markets on the weekends and potentially do some online sales. There is a lot to getting a baking business started....

There wasn't much leftover...I love how people try to
be polite and not take the last cookie, but people ended up
tearing pieces off

Today I decided to work on a business plan for the bakery and start perfecting more recipes. I have several that are market ready, but I could always use more (many more, preferably). I tend to try to bake the things I loved when I was younger. Cinnamon rolls are something my grandmother really excels at, and my brothers always beg her to make them. I decided to try my hand at them. Gluten free rolls are....not quite the same (at least not the rolls I've made so far). The dough does hold up to rolling for cutting, but it's soft enough that the cinnamon swirl loses its definition and I press into a rectangle rather than attempting to roll. I'm personally allergic to baker's yeast, but my husband tells me they are quite good. He's gotten to be a pretty reliable food critic, and although he isn't always very descriptive as to why he does or doesn't like something, I know I can trust his overall opinion.


Cinnamon Rolls

makes about 8


Rolls
1/2 c Teff Flour
1 c Brown Rice Flour
1/2 c Tapioca Flour
1 1/4 c Sweet Potato (cooked and mashed)
1/2 tsp salt
4 T melted Palm Oil
1/2 c water
2 T Yeast
1 T Maple Syrup


Cinnamon Filling

7 Medjool Dates
1/4 c packed Raisins
1/4 c Coconut Oil
1/2 t Cinnamon
2 T Maple Syrup
pinch salt

Preheat the oven to 375 degrees. Put the dates and raisins in water to soak and set aside. Warm a 1/2 cup of water to 110 degrees and add the maple syrup and yeast. If the water is the right temperature, you will see the yeast foam up within the first couple minutes. Combine the dry ingredients for the rolls and melt the palm oil. Add the yeast mixture and palm oil and fold into the dry ingredients. I end up getting my hands dirty to make sure things are well combined (be careful not to overmix/handle).

Drain the dates and raisins and put them in a food processor with an S blade until the dried fruit starts to form a ball (it should be close to a paste at that point). Put the mixture in a mixing bowl and combine the maple syrup, cinnamon, and coconut oil. Set aside.

Put a piece of parchment paper over a cookie sheet and work the dough into a large rectangle shape.


Put tablespoons of the date/filling mixture around the dough and GENTLY spread the mixture with a knife, being careful not to tear the dough underneath.


Once the mixture is evenly spread, roll the dough.


Score the dough and cut into even pieces, about an inch and a half thick.


Bake for 30 minutes or until a nice golden color:


Icing
2 T Palm Oil
1/2 T hot water
2 c Powdered Sugar - approximate
vanilla

Stir the palm oil and hot water together with a hand mixer, along with vanilla bean (1/2 a bean scraped or 1/2 tsp extract). Put 1.5 cups sugar in a fine sifter and sift the sugar. Combine the mix and continue to add sugar as necessary to achieve the right consistency. These measurements may be a little off - I tend to eyeball frosting.


Thursday, February 10, 2011

Vegan, Gluten Free Pizza

On a normal day, I have a smoothie or chia protein pudding for breakfast, gigantic salad for lunch, nuts for a snack, and I browse through the evening. Sometimes that means a salad, soy-free miso soup, and/or a series of snacks. The night before last, I decided to continue a run of not so fabulous diet choices and make pizza! Kind of. It could definitely use some acid - maybe a balsamic reduction? I liked the crust though.

The crust is baked separately from the rest of the ingredients. There are a lot of steps, but if you'd rather change the toppings and mix it up, I'm sure that would work. I would bake the crust for 10-15 minutes at 400 degrees and then add toppings before cooking another 10-15 minutes. Pesto, mushrooms, and thin sliced red onion would be tasty.


Gluten Free Crust
1.2 oz potato starch
1.5 oz brown rice flour
2.5 oz millet flour
pinch salt
1 tsp onion powder
1 T chives (dry)
1 T palm oil
1/4 c water

Preheat the oven to 400 degrees. Combine the dry ingredients. Add the palm oil and use a fork to work the palm oil into the flour until nearly undetectable. Add the water and knead lightly. Press onto a cookie sheet in a thin circle about 10-12" wide. Bake for about 30 minutes.


Cheeze
1/3 c macadamia nuts
/14 c cashews
lemon juice
pinch salt
enough water to blend the nuts in a high speed blender and achieve a smooth consistency

After the crust has cooled a bit, spread the cheeze over the top.


Potato Cake

1 large potato
olive oil
salt

Thinly slice the potatoes on a mandolin. Heat a non-stick pan (preferably ceramic) to medium. Put olive oil in the pan and layer the potato slices. Let brown. Take a lid and flip the pan contents onto the lid. Slide the potato cake from the pan lid back into the frying pan to brown the other side. When done, flip the cake onto the lid again as it's easier to transfer to the pizza from the lid than from the pan.

Broccoli Raab
3 cloves garlic
olive oil
lemon juice
2-3 cups broccoli raab, rough chopped
1/2 sliced onion (optional)

Saute in a frying pan until wilted. Spoon the contents over the pizza.


Cut and serve. I served this with a small side salad of celery root, mung bean sprouts, and juiliened cucumber tossed with the leftover cheeze.


Bake Sale

There is a bake sale tomorrow at the Sidecar for Pigs Peace starting at noon in the Seattle U-District. I will be dropping off goodies (chocolate chip cookies and ginger cookies) at 10am, and will try to swing by again either later that day or the next to buy gluten free treats!

Friday, January 28, 2011

Churro Cookies


Some of my better recipes are mistakes! When I was little, my favorite cookie was the Snickerdoodle. There's something about the slightly grainy texture on the outside, the shock of cinnamon, and the crunchy texture underneath. Yum, yum, yum.

I've been trying to sub out coconut oil for palm oil, and have been trying various natural cane sugar replacements. I've found that palm oil just works with cookies and sugar is really what gives cookies that crunch. These cookies definitely don't have that classic crunch, but the result was unexpectedly popular.

When my brothers and I were younger, we liked it when my mom would stop by a fast food place and let us order dessert. One of the taco chains had churros. We loved them! Greasy, crunchy, gooey, and gritty all at the same time. I think I remember they came out with a cream filled churro and it ended up being way too much - they are so greasy without the filling. I'm pretty grossed out by some of the things I used to really look forward to. If I had a crystal ball and could see the allergies I would develop, I probably would have scraped together the money to make it to Europe and make a food vacation out of it.

Back from my tangent....when my brothers were over last weekend, they devoured these cookies. They both really liked them and couldn't put their finger on what it was reminding them of. I took a big bite and sat there thinking as I was chewing and it finally dawned on me. Churros!

Churro Cookies
1 c White Rice Flour
2/3 c Teff Flour
1/4 c Arrowroot Powder
6 soaked Dates
3/4 c soak water
1/2 tsp Baking Soda
1/2 tsp Baking Powder
1/4 tsp Cream of Tartar
1/2 c + 2 T melted Coconut Oil
1.5 oz (1 shot) of Agave
1 Vanilla Bean, scraped
1/2 tsp salt

Enough vegan cane sugar and plenty of cinnamon to coat each cookie generously.

Preheat the oven to 350 degrees. Combine all of the dry ingredients. Add the coconut oil and agave. Put a handful of cane sugar (1/4 c) and 1 tsp of cinnamon on a small plate. Form dough into balls about the size of a golf ball, and roll around in the sugar and cinnamon mixture. The dough will be greasy. It's part of what makes them good. Flatten out the cookie on a cookie sheet with the flat of your hand. Bake for 8-10 minutes. Let cool and then move to a cooling rack to cool further.

Tuesday, January 25, 2011

Blueberry Upsidedown Cake


I am so excited to be blogging tonight. It's the first time that I've had a few quiet moments to spare.

Sunday was a busy day full of baking and family. I got up fairly early in the morning, fed the dog, cleaned the kitchen, and then started baking up a storm. I'm having a bunch of people over to taste test a bunch of my recipes, and I wanted to make some improvements. The day before I had made some chocolate chip oat cookies and snickerdoodles. I made the snickerdoodles with coconut oil instead of palm oil because we have a friend that has a palm allergy. I have to say palm oil works a little better in cookies. Coconut oil is great in cakes, muffins, and cupcakes though.

Snickerdoodles

thin oatmeal chocolate chip cookies

Next was a batch of Sweet Potato Donuts. A lot of my recipes have improved over time and I wasn't sure if I'd still be impressed with the recipe. It really didn't disappoint though. We don't often fry food. I used canola oil this time and filled a pan enough for the donuts to be completely submerged and cook evenly. I laid out a tray, put paper towels on the tray and then layered a wire cooling rack over the paper towels. It worked really well. I'll admit I made a big mess sprinkling powdered sugar on top with a wire fine mesh strainer.

Donuts on their cooling rack post powdered sugar -
the area was a mess after that sifting


Next up were Cinnamon Rolls. I'm told they are quite good, but I need to work on a thicker filling. This time I used date syrup and palm oil with a little maple syrup. I think next time I will be processing dates without soak water to make a paste.

Frosted Cinnamon Rolls

After the cinnamon rolls, I had a brilliant idea for a blueberry upside down cake. I put too much blueberry sauce in the pan on the first go and not quite enough the second time. Getting the cake to layer on top is a little difficult.


Messy - but tasty! - upside down cake

The neater version - the ideal is somewhere between the two

I also made some pretty decent dinner rolls to go with dinner. While Mom and I were getting dinner ready, the boys were having fun in the living room. Annie is absolutely obsessed with the laser light. Owen loves clicking the button to make the light turn on for the dog, but I have a feeling he doesn't completely understand what's going on....


Owen loves being at our house and whenever Lance was outside, he'd ask "Where Choo Choo??" Apparently, Lance is Uncle Choo Choo. After dinner, my family went home and I got a text message from Mom mid-trip. Owen got into the cookies and really liked how the doughnut fit on his finger like a little hat.

Last night my car broke down, so my evening was shot after work. I found out today that there's an issue with the fuel injectors. The cylinders aren't sealing completely, so the cylinders are flooding with fuel after the engine is shut off, making restarting it any time soon after running an errand impossible. After an hour and a half of letting it sit, I was able to drive it a quarter of a mile, but it was running so rough and smelled horrible, so I pulled in a gas station. Fortunately, Lance was in his car behind me and we were able to go home after the truck came. It was a long night.


Blueberry Upsidedown Cake


Blueberry Sauce/Topping
makes enough for 2 cakes
1 pint Blueberries (fresh is best)
1 tsp+ Orange Zest
1/4 c Sugar
1/3 c Coconut Oil
1 Cinnamon Stick - whole

Put the ingredients in a sauce pan and heat until the oil melts and the sugar dissolves.

Keep the cinnamon stick intact, and remove the stick and take off the heat once the mixture has come to a boil.


Maple Cake
makes 1 cake
1 c White Rice Flour
1/2 c Teff Flour
1/4 c Arrowroot Powder
2 tsp Baking Powder
1/4 tsp Salt
3/4 tsp Cinnamon
3-4 T melted Coconut Oil
2 T Chia seeds, ground
1/2 c Sugar
1/2 c Maple Syrup
1/2 tsp Orange zest
Appx 1/2 c. water

Preheat the oven to 325 degrees. Sift all of the dry ingredients together. Add the maple syrup, melted coconut oil, and then just enough water to get the batter to the right texture. It needs to be thick enough to sit on top of the blueberry mixture without mixing too much.

Bake the cake for around 40 minutes. The cake is done when you can insert a toothpick and it comes out clean. Run a knife around the side and push the cake in a little bit. Put a plate on top of the pan and flip the cake over. tap the plate and pan on the counter top a little until the cake falls loose.